
From this 20watts Integrated Amplifier project. Some people said that expensive and want the main amplifier only.
I recommend the HA13001 Audio car amplifier circuit project. It has a budget of only 5$. And is the main amplifier only.
They have the power to a speaker is 40 watts. And use a 12V power supply.
So, we can apply in the car or our house. They use the HA13001 is key parts so small and build easily.
HA13001 Datasheet
5.5W Dual / 17.5W BTL Audio Power Amplifier
The HA13001 is a small amplifier IC made by Hitachi. I saw it a long time ago in an old car stereo. It outputs about 2×5.5W in stereo. It can be set up as a 17.5W BTL circuit.
Short Features
- Vcc max 18V
- Vcc typ: 13.2V for CAR system
- Imax: 4.5A
- PO: 5.5W
- Gain: 50 dB
- RL: 4 ohms speaker
- Noise: 3uV
- THD: 10%
- ICC typ: 80mA
How This Circuit Works
When seeing a circuit. Many people would doubt that. This circuit will be amplified up to 40 watts. It is peak to peak power.
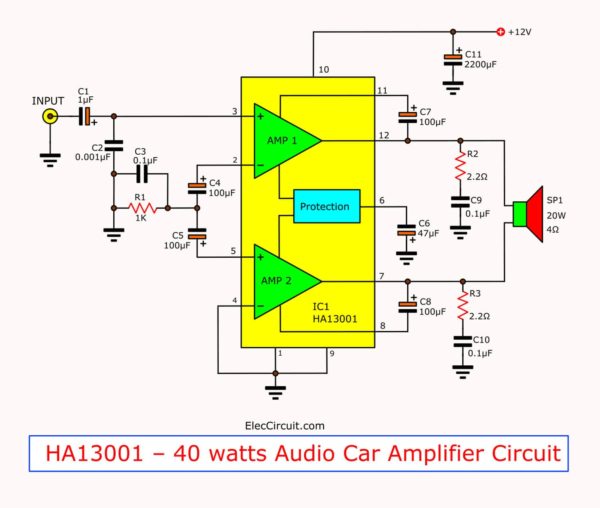
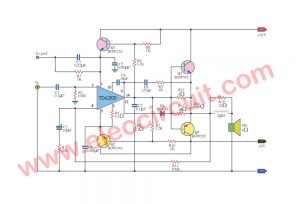
HA13001 Car Audio Amplifier Circuit
But in RMS, it will is about 17.5 watts at load 4 ohms.
You do not insult it. It is enough for your room.
So what?
Have you ever use Motor or Other electrical appliances from the Hitachi factory?
They are great, right? this too.
Even it small but full option. The HA13001 includes a lot of circuits inside. So use a few external devices.
And connect a loudspeaker to the output of IC1 with the bridge circuit pattern. So causes the output has high power.
We do not fear that the speaker will be damaged easily. Because in IC1 has the Automatic Shut-Off circuit (ASO).
It will protect the speaker. Thus, you do not need to carefree.
And this circuit will use the DC power supply range between about 12-18 volts source.
You may also like these:
How to build this project
This simple project started with making the PCB before. Which has the copper layout as Figure 2.
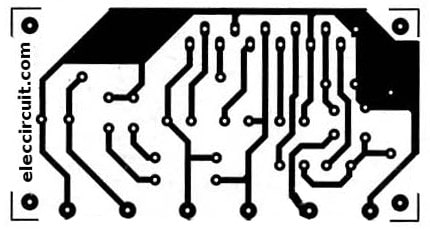
The PCB layout
Then, solder all components as Figure 3.
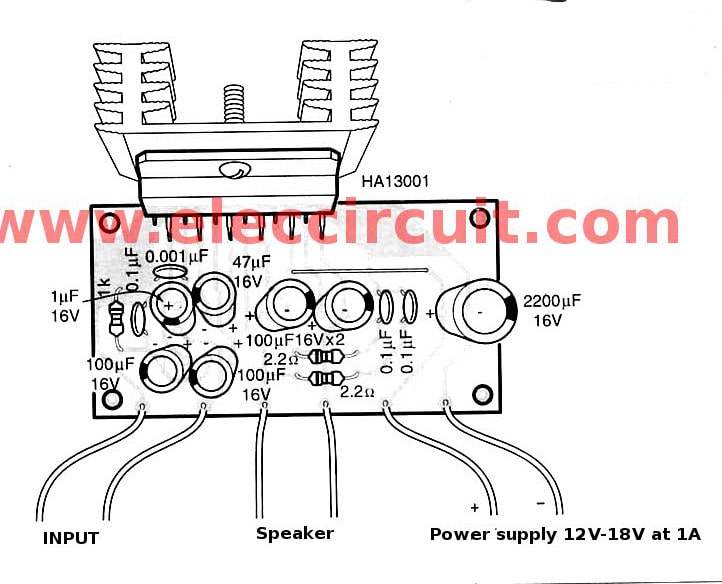
Figure 3 The components layout for PCB
We can solder directly the IC1 onto PCB. So we should take special care.
The trick: install IC1 on a big heatsink fist. Then, solder it, will well look and fit.
The power supply that can use a DC adapter. But must provide current over up 1 ampere.
Otherwise, when you turn the too more volume. The sound will break or Distorted sound. And the Adapter will malfunction.
The application this projects
This amplifier project uses to amplify from various sound generators. Such as the iPad or mobile phone or notebook computer etc.
Or Modified into the old car stereo that repairs difficult. We changed the settings to this amplifier.
The detail parts
The electrolytic capacitors 16 volts
C1: 1uF
C4, C5, C7, C8: 100uF
C6: 47uF
C11: 2,200uF
The ceramic capacitors 50V
C2: 0.001uF
C3, C9, C10: 0.1uF
IC1_number: HA13001
Buy HA13001 at Amazon.com here (Affiliated link)
¼ W + 5% Resistors
R1: 1K
R2, R3: 2.2 ohms
Speaker 20 W 4 ohms
Heat sink for IC1
Recommend other circuits
Even now comes the best Circuit.
Look: 60 watts Car Amplifier using TDA1562
Not only that:
GET UPDATE VIA EMAIL
I always try to make Electronics Learning Easy.

I love electronics. I have been learning about them through creating simple electronic circuits or small projects. And now I am also having my children do the same. Nevertheless, I hope you found the experiences we shared on this site useful and fulfilling.

Anyone can help me provide a amplifier circuit diagram for a 16watt 8ohms and 5watts 8ohms speaker,,please for someone who can provide with a complete details such as parts values ang voltage, i will give you a BIG THANK YOU!
Hi, first congrats for this useful website. By the way I don’t get the meaning of this sentence:
“The power supply that can use a DC adapter but must provide current over up 1 amperes. ”
Do you mean “over 1 ampere” or “up to 1 ampere”? Thanks in advance
Hi,Pozzo
Thanks for your feedback.
I am sorry for my English.
It means over 1 amperes.
Not up to 1 ampere.
ok-very good
Can anyone help me out with a picture of a stripboard amp using a stk463