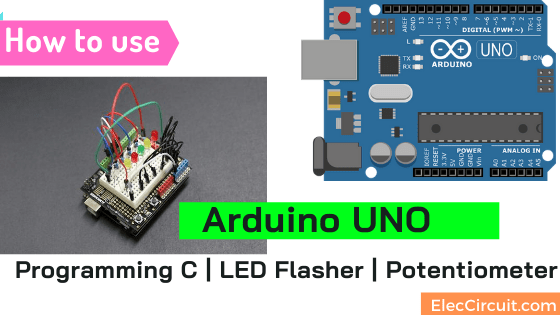
Many friends suggested that my son should learn to use the Arduino microcontroller before.
So it is First Arduino UNO R3 Board R3 leaning Board of my son.
The Arduino is the concept characteristics Platform consists of Hardware and Software. Used for connecting computers to the physical environment, including users, called Physical Computing.
The Arduino starts publishing works around the year 2005. The purpose is to create hardware and software is Open Source. Disclosure of the source code, schematics for the board microcontroller, and other detailed documents.
For example Manual, sample code, under its publishing and development. For those who want to create Electronics Prototyping.
Why Arduino has been widely popular?
- Easy to use, For example, using the power from the USB port + download via USB from a PC or notebook. Do not use the Hardware Programmer. Which may have a higher price than the price of the board’s microcontrollers.
- The software used to develop applications for the Opensource (Arduino IDE).
- Run multiple platforms (Windows, Mac OS X, Linux).
- Disclosure of the source code And to further development
- Disclosure circuits (schematics and PCB files for PCB) is OpenHardware.
- The Circuit disclosed, under the name Creative Commons License https://creativecommons.org/licenses/
- There are a variety of hardware Arduino Boards / Arduino Clones / Arduino Shields
- Applied to a wide variety of applications, such as robot control, flight control devices (Flight controller) for Quadrotor device readings from sensors and sends the data to the IoT Cloud.
- First learning with a LED flasher
We try to create a simple LED flasher.
Start downloading drivers from https://www.arduino.cc/en/Main/Software.
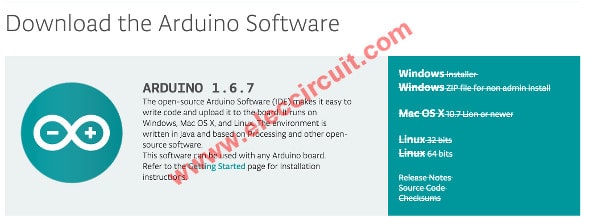
To install a computer.
Downloading Arduino driver
Then we apply the board to the computer through a USB port.
The first program, the default is “Arduino Blink”. It is the most common example. To determine the function of the board.
After opening the program We got to sample “Blink” to the menu File -> Examples -> Basics -> Blink.
The first Arduino blink
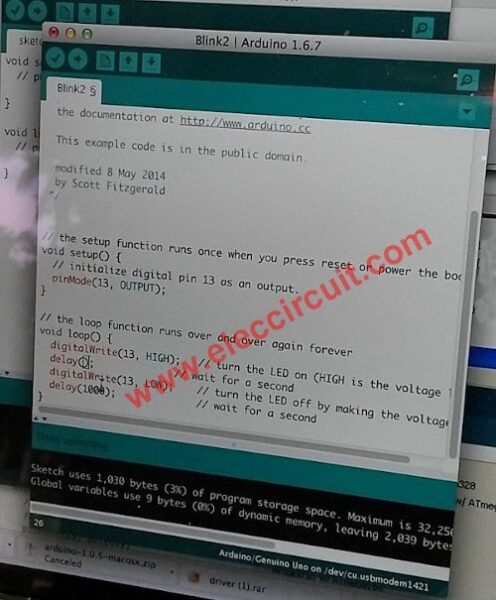
The first Sketch will also be open. It has a statement less the line. It ordered the Arduino board LED flashing numbers 13 onboard only.
The LEDs alternately flash ON and OFF about once per second.
We use output this so use the 13 port
how to apply the output 13
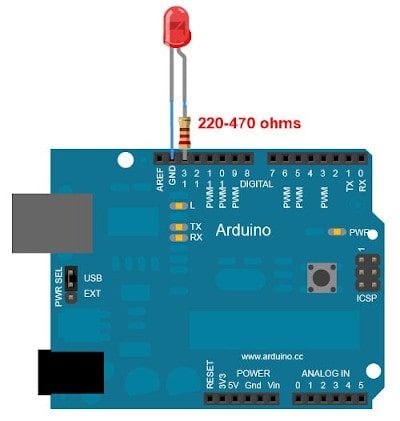
We use the external LED and 470 ohms in series on the small breadboard.
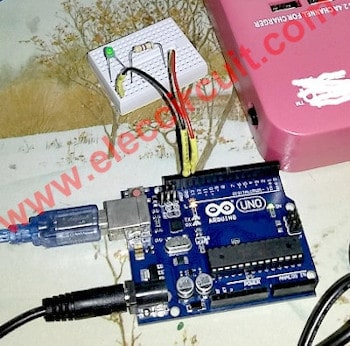
Note: You may Buy the Arduino UNO from amazon.com
How to learn Arduino UNO programming C (Simplest)
Let’s do one LED flasher. Which we use the Arduino Software (IDE). Although, difficult to use, because of the text mode. But it works completed, the most popular and free.
Step by step as 9 years boy learning.
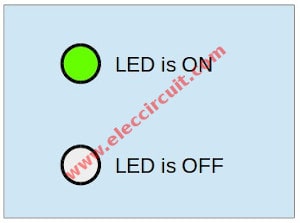
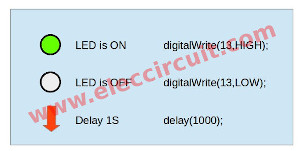
1. Define a symbol that human understand
“LED is ON” and “LED is OFF”
Figure 1
2. However, since the LED changes from “ON” to “OFF” very quickly. The human can not see it.
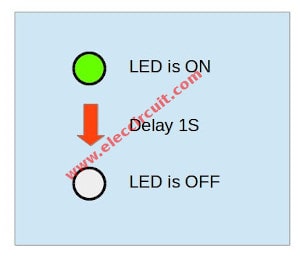
We need to delay the LED ON longer for 1 second
Figure 2
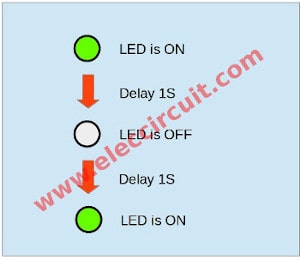
3.We start with programing, add a delay and “LED is ON”.
The system will always work from the top to down.
Figure 3
4. From text that human understanding, converted to the code of the program. We have to remember it, calm down, if it would be easier to use.
LED is ON ==> digitalWrite(13,HIGH);
LED is OFF ==> digitalWrite(13,LOW);
Delay is 1 S ==> delay(1000);
Figure 4
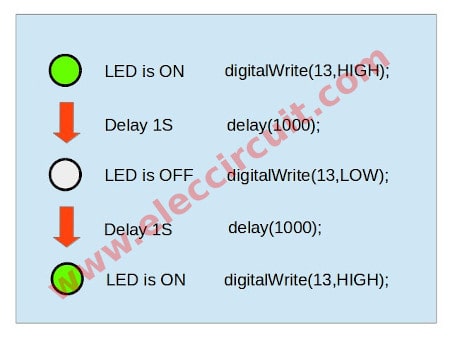
5. Instead code in the function chart of Figure 3.
LED is ON ==> digitalWrite(13,HIGH);
Delay is 1 S ==> delay(1000);
LED is OFF ==> digitalWrite(13,LOW);
Delay is 1 S ==> delay(1000);
LED is NO ==> digitalWrite(13,HIGH);
Figure 5
First Programing Arduino
Then, we open the Arduino IDE which we download from www.arduino.cc
– Click menu to New. There is As Figure 6
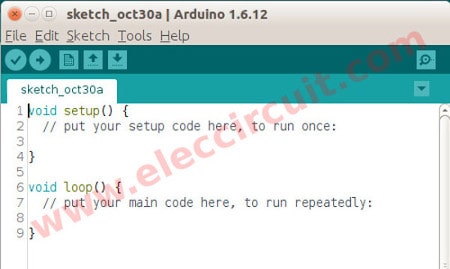
In section 1, “put your setup code here, to run once:”
– To setup value! We need the pin 13 as output.
– Type the code: pinMode(13,OUTPUT);
In section 2, “ put your main code here, to run repeatedly:
To type all code below.
void setup() {

  pinMode(13, OUTPUT);

}

void loop() {

  digitalWrite(13, HIGH);
  delay(1000);
  digitalWrite(13, LOW);
  delay(1000);

}
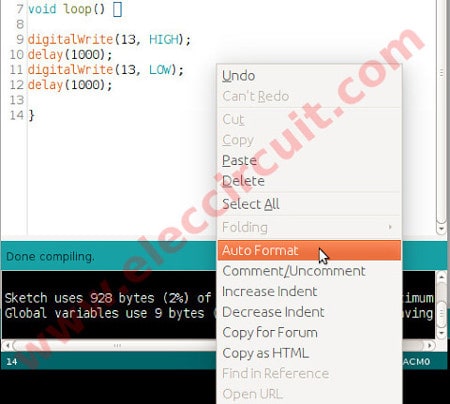
When typing the code and see a mess, click the option Autoformat as Figure 7.
Read also: DIY Flashing Bicycle LED Taillight Circuit
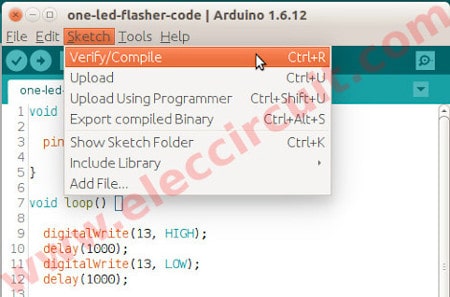
Next, when you’re done typing. Click at Sketch > Verify/Compile. It will be done for no error.
As Figure 8
Then, apply USB port to computers
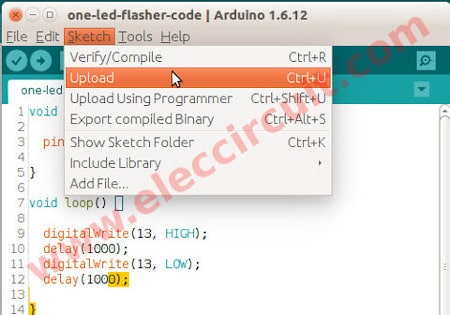
Finally, Click to Sketch>Upload code to the arduino board. As Figure 9
We are seeing LED pin 13 on board blink, as code programing.which we can change time as delay code.
I hope you will do this like me. Start, write code is not as difficult as we thought.
Recommended:
- 3 LED flasher using 3 transistors astable multivibrator
- PIC microcontroller learning for beginner
- LED Flashers Circuits and Projects using transistor
Adjustable LED flasher(first using a potentiometer)
Then, we will make an Adjustable LED flasher-first potentiometer using Arduino. It is the first time that we use it.
First to use potentiometer on Arduino
Arduino has the analog input pin (A0 to A5 for reading any signals. When we apply voltage to a potentiometer and to analog input pin Arduino. We can apply to control electronics appliances. When we rotate the potentiometer make a voltage across it change.
The Arduino can read this change. As Figure 1 analog input pins and Power output pins that we use with the potentiometer.
Figure 1 Analog input and Power output
Recommended: 1.5V 4 LEDs Flasher circuit using transistors
Parts you will need
We have to find the parts below.
- Arduino UNO R3
- Potentiometer, 100K
- One LED
- 470 ohms resistor
- Jumper wires
- Breadboard
How to build

We look at the schematic in Figure 2 and then connect circuits as Figure 3 and Figure 4.
Schematic
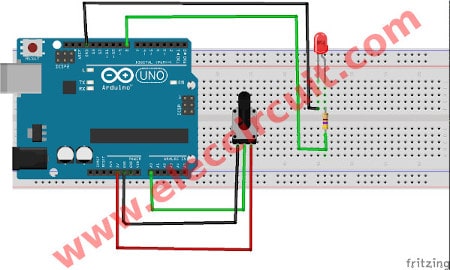
Circuit connection

Adjustable LED flasher first potentiometer using Arduino
Next, we write the LED flasher code on the Arduino IDE as Figure 5
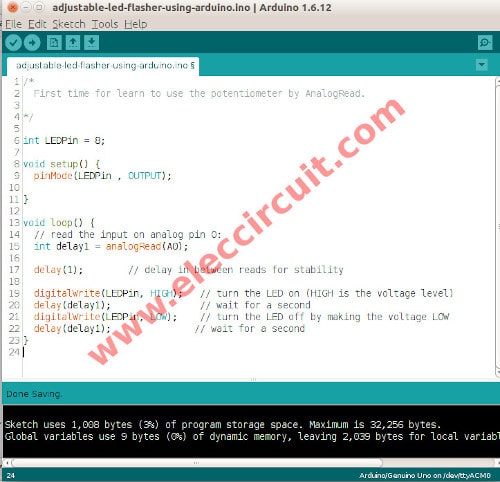
Figure 5 1 LED flasher Arduino IDE code
/*
First time for learn to use the potentiometer by AnalogRead.
*/

int LEDPin = 8;

void setup() {
pinMode(LEDPin , OUTPUT);

}

void loop() {
// read the input on analog pin 0:
int delay1 = analogRead(A0);

delay(1); // delay in between reads for stability

digitalWrite(LEDPin, HIGH); // turn the LED on (HIGH is the voltage level)
delay(delay1); // wait for a second
digitalWrite(LEDPin, LOW); // turn the LED off by making the voltage LOW
delay(delay1); // wait for a second
}
We will see that command “analogRead(A0” to used to read the analog or voltage.
Then, the Arduino will be processed into any one variable from 0-1023 we bring the value to delay1.
For the one LED flasher code can read at one LED flasher above.
As the video, we test to rotate the potentiometer cause LED flasher slow-fast.

I love electronics. I have been learning about them through creating simple electronic circuits or small projects. And now I am also having my children do the same. Nevertheless, I hope you found the experiences we shared on this site useful and fulfilling.


How to make seven segment clock with ardiuno.