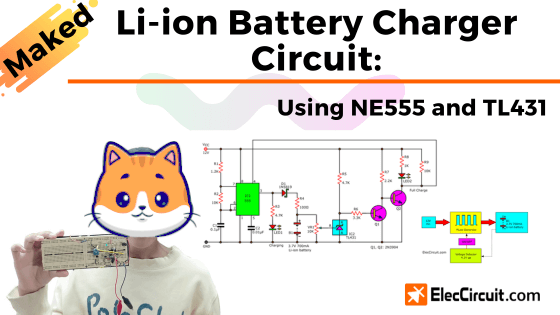
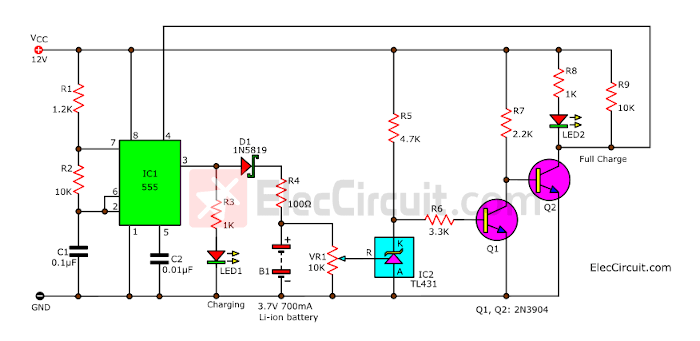
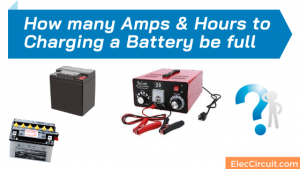
This is a simple Li-ion battery charger circuit with an automatic cut-off when fully charged. This circuit will help revive batteries that you think are dead or so old that they can no longer be reused.
We made the circuit with commonly used components such as the NE555 timer and TL431 shunt regulator. It uses the principle of charging the battery with a low-current pulse signal. Making it a safe and impressionable performance charger.
Of course, it can make us smile again because it’s both economical and easy to build. Try to build it, and you will smile like us.
We received a large amount of broken small electrical appliances such as cameras, electronic dictionaries, etc. Although many consider it to be worthless e-waste. But for us, they are good teachers; many times we gain knowledge through experimenting with various electronic circuits.
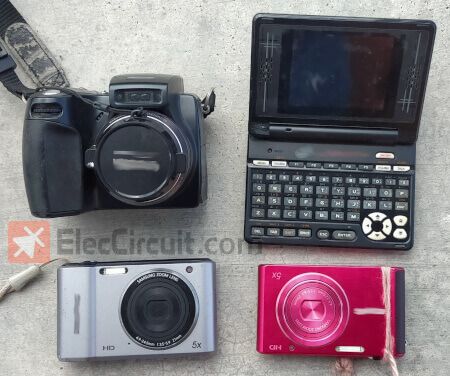
The 3.7V 700mAh Li-ion batteries are interesting parts. Even though they are small, they are still enough for small circuits with low power, such as digital meters, digital CMOS circuit experimentation, and so on.
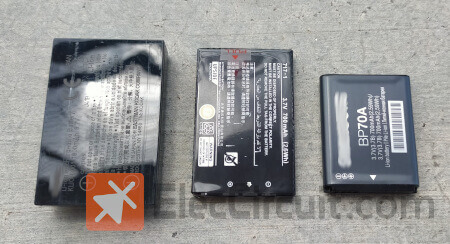
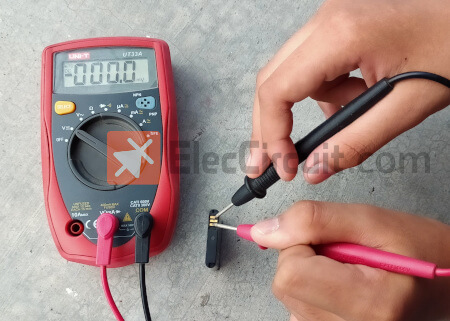
But when we measured their voltage, there wasn’t any. Because they were left out for so long. Our friends said that the voltage of this type of battery should not be allowed to be lower than 2.5V as it may deteriorate.
But we will try to revive them and make them usable again.
Choosing the right method
Imagine that we are going to awaken the elderly who have been asleep for a long time because these people still have the ability. Past experiences are valuable to us today and in the future.
But we should wake them up gently because they might be shocked to the point of death (really, LOL).

Broad Concept of Li-ion Battery Charger Circuit
We believe that every problem is solvable. But you should understand the problem and have a broad concept of it first. Then, start with what you have and do it first. Then, gradually improve upon or blend it to perfection. Of course, we will always be improving.
Li-ion Battery Charger
Reusing this type of battery means just adding energy to it or charging it.
Charging with a suitable current: It should be charged with a small current to reduce heat generation. If the size of the battery is 700mAh, the current charging rate should be 0.1C or 70mA, and charged for about 10 to 12 hours. But in this case, we would like to try charging it with a lower current of about 35mA, and the charging time would rise to about 20 hours. So, we would not put much of a strain on the battery.
Stimulated it with a DC Pulse signal: We wanted to experiment with charging it with fluctuating current but still, a DC voltage to better stimulate the battery cells.
Battery voltage must not exceed 4.2V: When charging the Li-ion battery, there is a strict rule. That does not let the battery voltage exceed 4.2V.
We have a 12V power supply: When the battery is charging, its voltage level rises to the level of the power supply. So, the battery will deteriorate or be damaged.
Thus, we need to solve these problems according to the Block Diagram below.
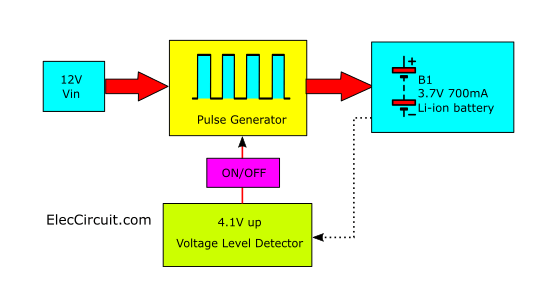
Even though we are using a 12V DC power supply, we can charge the Li-ion battery with it. Because the pulse signal (from the Pulse Generator) reduces the average voltage to about 5V, lowering the current going through the battery.
We also added the Voltage Level Detector to monitor the battery voltage level. If it exceeds 4.1V, it will turn off the Pulse Generator, stopping the supply of current to the battery immediately.
Convert from block diagram to circuit
Next, let’s convert the block diagram to a simple circuit.
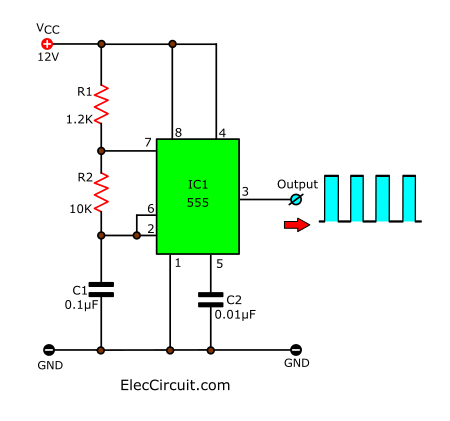
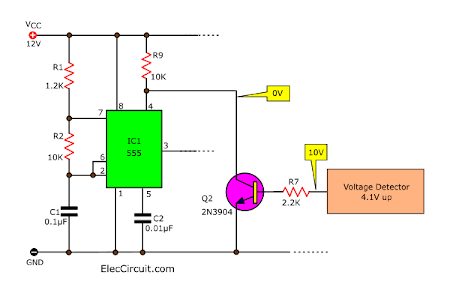
NE555 Pulse generator
First, regarding the Pulse generator block, we chose the NE555. Because it can work as a 555 astable multivibrator circuit, or what is called an Oscillator. It produces a good square waveform and is capable of delivering a maximum current of about 200mA. Which is enough to charge our batteries.
Next up, we add a few more components before trying to charge the battery.
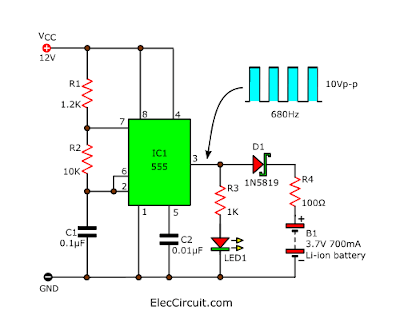
- R1, R2, and C1 set the output frequency at about 680Hz with a signal size of about 10Vp-p.
- LED1 indicates whether the signal on pin 3 is normal or not.
- D1 to prevent reverse voltage from the battery when the current starts to fill up.
- R4 reduces the current flowing through the battery to about 35mA.
The signal read out at pin 3 showed a rectangular pulse waveform of about 10Vp-p. Next, we measured the battery voltage level rising from zero to about 2.7V in a moment. These indicate that the pulse generator is working properly.
Resets the NE555 timer
And now we are going to find a way to stop NE555 from working.
According to the graph below, when the voltage at pin 4 of the 555 timer is lower than 0.6V. It would halt all signals coming out of pin 3—or, in other words, stop working.
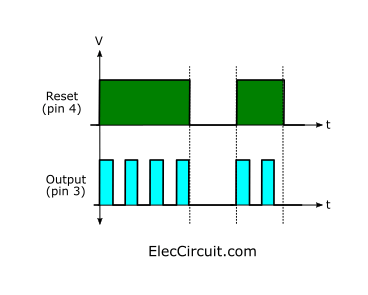
In the circuit below, we add R9 (10K) to pin 4 to maintain the initial state of “High” and add Q2 to act as a closed switch to change the state to “Low” or 0V to reset IC1. It can only be switched on if it receives the voltage in the “High” state from the voltage level Detector block.
The voltage Detector using TL431
Next, let’s look into the Voltage Level detector block. We have several options here, such as the LM339 comparator, OP-AMPs, the Zener diode, transistors, and more. But in this case, we chose the TL431 because it’s simple, cheap, and reliable.
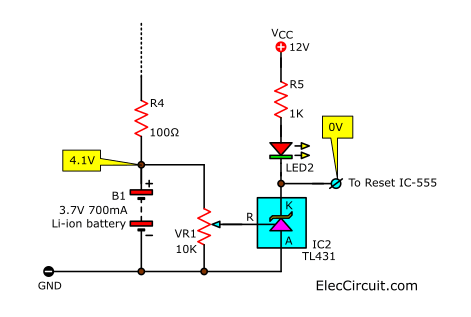
In the circuit above, when the battery voltage rises to 4.1V. The IC2 (TL431) detected the voltage. and thus allows current to flow through via pin K to pin A. The LED2 is then lit, and the voltage at pin K changes to a “Low” state. In theory, it will reset the NE555.
But in our practical experiment, we still need to use transistor Q2 because IC2’s K pin still has a voltage level of about 0.9V, which is not capable of resetting IC1.
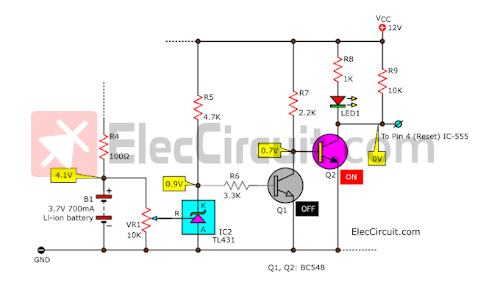
We still need to add Q1 to connect IC2 and Q2 together, as shown in the circuit. If the voltage level of the battery exceeds 4.1V. The IC2 detected that and let the current flow through it. Then, the voltage level at pin K is lower to about 0.9V. So there is no current flowing through R6 to B of Q1, thus Q1 cannot be turned ON and remains OFF.
The base current thus flows through R7 to B of Q2. As a result, Q2 turns on, and LED2 is lit up. Of course, pin 4 (reset) is “Low” because it has a voltage of 0V, stopping the current from pin 3 of the NE555 and the battery is no longer receiving current. The voltage level of the battery is therefore definitely lower than 4.2V.
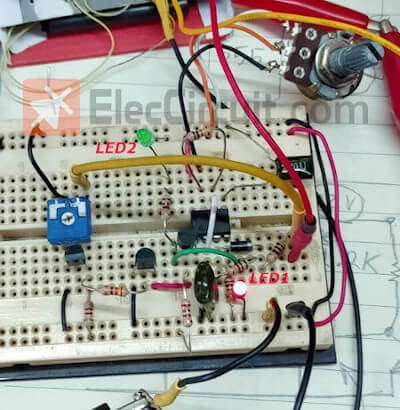
Now we put all those small circuits together, turning them into a complete Simple Li-ion Battery Charger Circuit.
Testing and Tuning Li-ion Battery Charger Circuit
Initially, the R1 that we used was a 10K potentiometer. So that the output frequency of IC1 can be adjusted. We tried adjusting the frequency to about 680Hz, and it was able to charge the battery well. When checking the resistance of the Potentiometer, the result is about 1.2K. For further usage, we recommend swapping R1 out for a conventional 1.2K resistor instead.
Setting up the voltage level detector
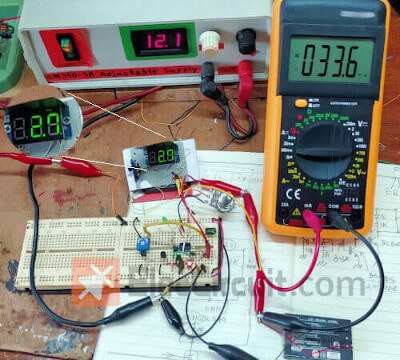
Recheck all components and do not make any mistakes. Connect a 12V Power supply to this circuit. You will see LED1 (Red) lit up, indicating that the Pulse generator circuit is working.
We need to adjust VR1 in the voltage level detector to set the checking voltage level at 4.1V. We use the variable voltage power supply set to 4.1V instead of the Li-ion battery while we are tuning. Then adjust VR1 slowly until LED2 (Green) is lit up, and LED1 will immediately turn off.
The circuit seems to be working pretty well. Now let’s try charging the Li-ion battery.
In the picture below, LED1 is lit, showing that the circuit is working. From the measurement, the current flowing through the battery is about 33.6mA and the voltage level of the battery has increased to 2.7V. Also, the battery temperature reading is normal.
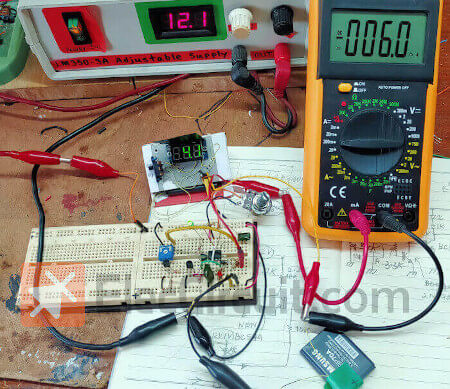
After about 22 hours, the battery voltage level rises to 4.1V. The LED2 lights up, but the LED1 immediately goes off. We also notice that the current flowing through the battery has dropped to -6mA, meaning the current from the battery has flowed out instead; no more current is flowing from the circuit. Indicates that the battery power is full.
We tried using the charged battery by connecting it to a super bright LED; it lights it up well and can last as long as usual.

Conclusion
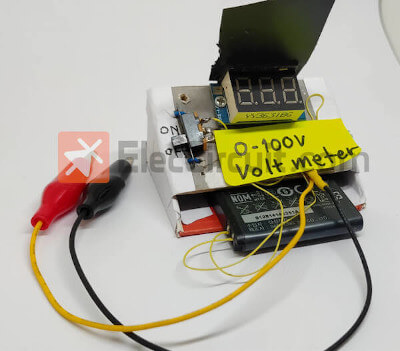
This Simple Li-ion Battery Charger circuit is very effective at reviving or waking up the old battery so it can be used again. The battery charged by this circuit can store power for a considerable length of time. We have been using it in a small digital voltmeter that my daughter built. And it has worked fine for about 5 months now. The voltage is still stable at around 3.7V.
But is charging with a very low current like this good? Considering the usage, it is not too difficult. Because we do not charge it often. Our load also consumes very low current.
We may add a 3V or below voltage detector circuit to the load to warn us to recharge it early; it is very convenient.
But if you want to charge faster, you can change R4 down to 47 ohms for a charging current of about 70mA. But it should not be too low because the IC-555 can power a maximum of 200mA current.
We hope you enjoy revitalizing the batteries. The next time you come across an old battery, do not throw it away. But it is a good idea to inspect it first. There may be swelling or chemical leakage from these batteries.
Download This
All full-size images and PDFs of this post are in this Ebook below. Please support me. 🙂
GET UPDATE VIA EMAIL
I always try to make Electronics Learning Easy.

I love electronics. I have been learning about them through creating simple electronic circuits or small projects. And now I am also having my children do the same. Nevertheless, I hope you found the experiences we shared on this site useful and fulfilling.

I love electronics
I and my dad are the same. we love electronics Thank you for your opinion. 🙂
thank you for the great work, I found in your website a lot of useful information
Hi,
Thank you very much. I am just a beginner. Electronics is quite difficult.
But I will learn more.
Do you have any more suggestions? 🙂
Very good circuit. I built it and it works well
Hi,
Thank you. I and my dad are so glad that you done this circuit. It worked fine. 🙂
Hi how are you I also love electronics so much
And you doing the best
Am Nelson from uganda
Hi,Nelson,
Thank you very much who find our website useful.
I’d appreciate it if you could give any further advice.
Best,
Chayaporn, 🙂
Great learning material and educational (and fun) article and projects. As a former College Prof it is gratifying to see information and activities with the younger people today. News reports are unfair as these kids on your site aren’t on the phones but occupying their time in self-learning!!
Great exa,ples!!
Barny Hiney PEng(Ret’d)
Hi Barny Hiney,
Thank you for visiting your website. My children and I are so happy and grateful to read your message. We will continue to learn like this. Even though it’s difficult for us to understand, We will try to do it. It would probably be the same for normal children all over the world. who likes to play games on their cell phones (my daughter does as well). We try to set aside time to learn about electronics. For his own future. Electronics is a good academic subject for every student. I want to be like you when I retire and use the internet and still do electronics. Thank you again.
Apichet Garaipoom,
Good day Sir. My name is Isiaka Tijjani. I am from Nigeria. Well great circuit but here in my country we hardly have more than six hours electricity so how can I improve the charging current to meet this time frame. Thanks once again for your good work I hope to hear from you soon.
Hi,
Thank you for your feedback. My dad and I feel great sympathy for you. Electricity is your shortage. But we believe you are a talented person. You may create your own electrical energy by various methods. Or even create a new battery with your existing resources. In the future, my father has a project to build a large-scale battery charging circuit. It might help guide you in solving your problem. We are here to help you. But my dad and I had limited knowledge. It may not be able to help you fully. But we will try harder for everyone be happy. If you have any problems, please tell us. We will be happy to help you find answers for a better life. 🙂
Hi , great project!!
on which software can we simulate this?
Hi,
Thank you for your feedback. I’m so excited to be able to reuse old batteries.
It works quite well. In the future I might make a power bank from old batteries.
It’s very challenging. Hope you will continue to follow me. 🙂
Please have you done that. I also have interest in the power bank circuit with easy get electronics components
Please can you guide me to construct a phone power bank that I can use to charge My phone and to be able to recharge the power bank too without removing the batteries. Using a simple electronics. Thank you sir, my best regards to your daughter.