If you are looking for long a timer circuit of more than 2 hours, highly exact and easy to build, and cheap. This circuit is the answer. It uses CD4060. How it is special?
Do you make simple timer circuits? It is easy and cheap. For example, using 555 timer IC, transistors, and more. They use the properties of capacitors and resistors. To create a time constant.
If Long time, it needs to use high capacitances (electrolytic capacitor).
For example, Electrolytic capacitor 1000uF. Fact, capacitances may be 800uF to 1,200uF. So, it has quite inexact of time.
Also, if the time is more than 30 minutes, needs a capacitor larger than 1000uF. It is too big!
Now, we have two circuits for you.
1# 5 hours timer control circuit
In the first circuit, we use it to control a load OFF when being due.
Imagine, You can see the water droplets (like mist) spread throughout the garden for a long time 2 hours. Why do that? Some plants need little water. But it takes a long time to water them.
Do you see an image?
The circuit’s concept
How can we solve this problem? Let’s find an answer.
First, how can use a small capacitor instead?
Do you remember the Simple pulse generator using CMOS gates?
See the output, it is a square webform. It looks like a rubber line.
Imagine, it is 1Hz or a period of time of 1 second. Then, I pulled the rubber line
Then, I pulled the rubber line out 1000 times or the time is added 1000 Seconds. You will see that the frequency is cut down to 0.001Hz.
So, it is a frequency divider. This idea is good, more stable. But how do it?
Good luck… there are some digital ICs, that can divide or count the high frequencies, causing the period to be extended.
Let’s look at the concept diagram of this circuit.
It consists of an Oscillator, divider, divider (multiple times), control, and connection to the load.
You might think We need many ICs. NO! only one CD4060 can do that.
Inside the IC has a Pulse generator circuit and 14 units of frequency divider/counter circuit. It can be divided by 2 to 14 times (divided by 16,384 times).
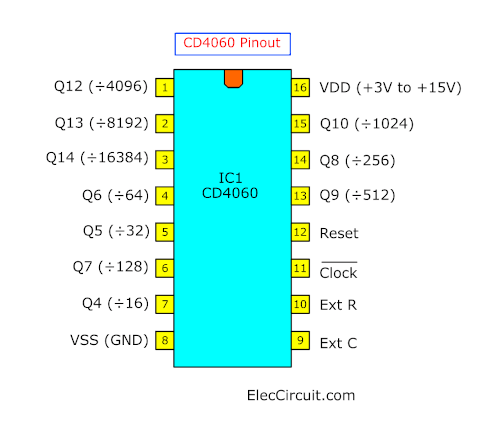
See pinout of CD4060
It has a total of 16 legs.
- Pin 16: VDD is a positive power supply, +3V to +15V
- Pin 8: VSS or GND is a negative power supply
- Pin 12: RESET all output is “0”
- Pin 7: Output Q4 Divide by 16(2^4) times.
- Pin 5: Output Q5 Divide by 32(2^5) times.
- Pin 4: Output Q6 Divide by 64(2^6) times.
- Pin 6: Output Q7 Divide by 128(2^7) times.
- Pin 14: Output Q8 Divide by 256(2^8) times.
- Pin 13: Output Q9 Divide by 512(2^9) times.
- Pin 15: Output Q10 Divide by 1024(2^10) times.
- Pin 1: Output Q12 Divide by 4096(2^12) times.
- Pin 2: Output Q13 Divide by 8192(2^13) times.
- Pin 3: Output Q14 Divide by 16384(2^14) times.
- Pin 11: Output Frequency (180 out of phase)
- Pin 10: To external resistor
- Pin 9: To external capacitor
I feel frustrated, explain to you how it works in a simple. But I will try.
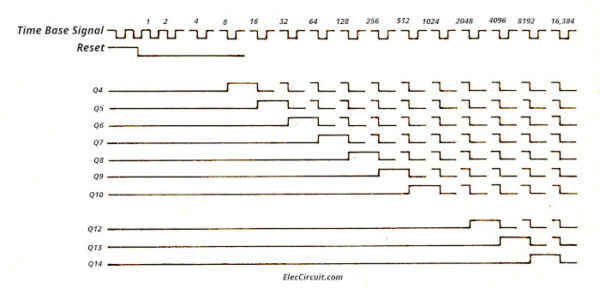
See the timing diagram below.
Imagine, we have a 16 Hz of Oscillator, at pin 7 (Divide by 16) will be 1Hz. You may understand not clear.
Below, this IC can generate a frequency itself, with helping of a few components, external resistors, and capacitors. Is it easy?
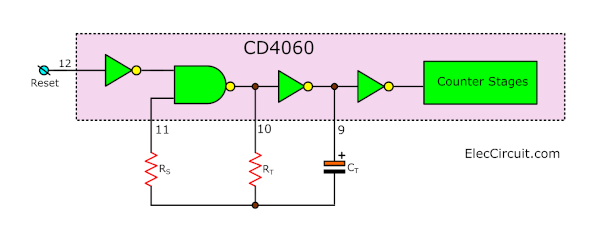
Calculate the time periods
T = 2.2 RT x CT
Rs is 10 times of RT.
We use RT= 220K, CT= 4.7uF, and RS= 2.2M
Read more about Pulse Generator using Note Gate
How it works
To begin with, press S1, AC voltage passes to SO1 ( power outlet) and the circuit.
Look at S2(selector switch), to choose the time period from the output pins. If not be due, each the pin be “0”. But, when are due, it will be “1” only the pin (we choose).
And at pin 12(RESET pin) of CD4060. Each time start, we should reset it to standby mode. Use C1 and R1. Some current charges to C2 through R1 to ground, so Pin 12 is “1” in a short time, RESET Mode.
Then, C2 full charges, no current via it, and R2 and pin 12 is “0”. So, IC1 is ready to operate.
See both transistors(Q1, Q2) work as the switch.
Now, all output pins of IC1 are “0”. Causing no base current of Q1, and it is “OFF”.
But Q2 gets bias-current from R4 and R5, causing Q2 to be “ON”. So, the current passes it to the coil of relay (RY1), the contact C to NO.
Look: It is across S1. So, although we release S1. But the AC voltage still comes to the circuit.
After that, the circuit count and counts until a set point. Such as we choose 2^4 at pin 6 to be “1”.
At B of Q1 get bias-current, Q1 is “ON”, causing Q2 not to have bias-current. The Q2 stops. So, the RY1 stops, too. No AC voltage to a load (power outlet) at all.
Recommended: How does an SCR work
Stop Before Time
If you want to stop the circuit before the time. Press S2 is like Q1 runs, causing no current to Q2, so Relay turns OFF.
Parts List for the 4060 Long timer
IC1: CD4060, 14 stage ripple counter, and oscillator IC
Q1, Q2: BC337, 45V 0.8A NPN Transistors
D1 to D3: 1N4007, 1000V 1A Diodes
Electrolytic Capacitors
C1: 2,200µF 25V
C2: 1µF 25V
Tantalum Electrolyte Capacitor
C3: 4.7µF 16V
0.25W Resistors, tolerance: 5%
R1: 10K
R2: 2M
R3, R5: 4.7K
R4: 1K
VR1: 250K Trimmer Potentiometer
Miscellaneous:
T1: 117V/230V AC primary to 9V-0-9V,200mA secondary transformer
RY1: Relay with SPDT 3A min. switch
Coil Voltage 12V. Coil resistance 150-600 Ohms
S1, S3: Normally Open Pushbutton Switch
S2: Single Pole 10 Positions Rotary Switch
Knob for S2
Plug = 3-wire plug & cord
SO1: Power Outlet on case
F1 = 117V/230V, 3A, slow-blow
FuseHolder,Wire,Solder,case,
How to build
If you want to be quick, you may as well assemble all the components onto a Perforated PCB board because of a few parts. Or if you want to solder it onto a normal PCB.
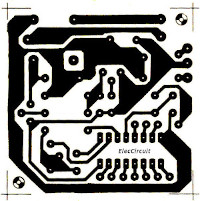
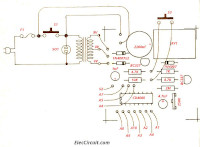
You can look at the PCB layout and the position of components, below.
The PCB layout
The component layout
In this project, you might assemble it on perforated PCB because of a few parts. Or if you want to solder it onto a normal PCB. You can look at the PCB layout and the position of components, below.
Start by putting Short devices first such as wires, resistors, Socket IC, diodes, etc. Importantly, Diodes should be placed in the correct position and their polarity, look at the color bar on them.
Then put higher devices such as Electrolytic capacitors, and transistors should be placed in the polarity as shown.
For VR1 it is a 3-legged horseshoe form. Only use the middle leg and the side leg (right). The left leg is not used. But it should be connected to the middle leg.
S2-Selector switch should be careful in installation. Due to the number of wires A1 to A10.
Connects the rest of the equipment is the transformer, AC power outlet, fuse Holder, Switch S1, S3, PCB, Wires, and others.
Time range: 19 second, 38 second, 75 second, 2.30 minutes, 5 minutes, 10:20 minutes, 80 minutes, 160 minutes(2:40 hours), 320 minutes(5:20 hours).
Let’s adjust and apply
Set the time to a minimum, the first is 19 Seconds. Start by plugging electrical appliances into AC power sockets. Press S1 to start the circuit. Adjust VR1 until the time is near correct. The test with a long time such as 2 hours 40 minutes.
2# CD4060 Timer Alarm Circuit
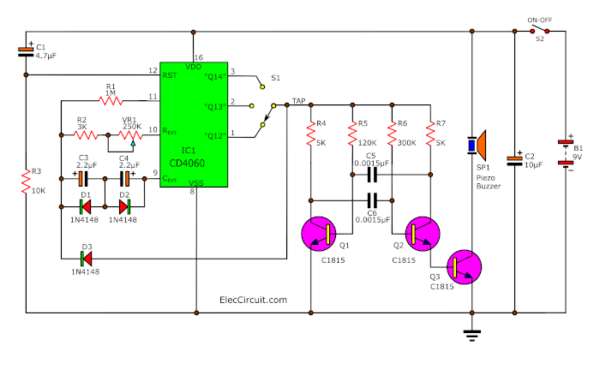
This is IC 4060 Timer circuit. When the rises time is set, Suppose set 5 minutes time. after all time to 5 minutes. the circuit will emit a sound buzzer once. This circuit use volume and switch to set the time clock.
Special feature
- Use 9V battery Or 9V power supply circuit
- Use current around 23mA (is working) 2mA (at standby)
- Can determine the time between 22 seconds to 4 hours. Example: 1-hour timer circuit, 2-hour timer circuit
- PCB size : 2.43 x 1.53 inch.
How it works
First of all, IC1 (Ic 4060) is a frequency divider IC, at pin 9, pin 10, and pin 11 are pins for connecting to R, C as frequency generators which can be adjusted by VR1. The signal that divider frequencies of IC1 will send out to pins 1, 2, 3
In figure 1 is the completely Alarm Clock Timer circuit.
Next, there is a switch as a selector to determine alarm time. When timing rises the time setting, at the TAP point will have voltage from IC1, send in both ways.
The first passed to D1-diode to the frequency generator sector. To make, IC1 stops the frequencies.
And, another way will send through R3-resistors go to pin B of TR1- transistor will work together with R4, R5, C2, TR2 and dynamic buzzer as frequencies generators.
Thus the dynamic buzzer so emits an alarm sound when to time setting.
Assemble 4-hour timer circuit
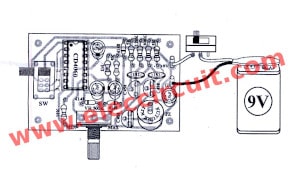
To begin with, a picture putting all components and connecting the external parts as shown in Figure 2.
Then, in assembling the circuit should begin from the smallest component before to so beautiful and easy, that start with a diode as followed by resistors and sort of height and so on.
And then, parts have various terminals such as a diode, electrolytic capacitors, transistors, etc. Be careful in the assembly circuit. Before putting these devices to PCB must coincide.
Figure 2 The single-sided PCB layout and the Component layout for the PCB
Note:
For the convenience of those who want to build this project. We design the PCB layout for you.
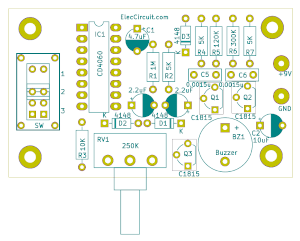
Figure 3 The component layout
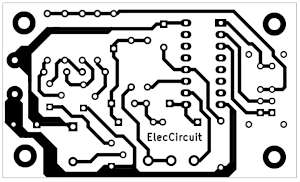
Figure 4 The PCB copper layout on 300 dpi per inch.
This circuit may be hard for you. Look below you may love them.
Simple 5-30 minuts timer circuit PCB
The testing
First of all, check all for errors. Second, connects a 9-volt battery to this circuit, the positive terminal at +9V and then the negative terminal to the ground. Then, rotate the 500K POT full left to MIN.
First, slide S1-switch to number 1, then release about 22 seconds, will emit sound at the dynamic buzzer, and then Take away the 9Volt out.
Second, slide S1-switch to number 2, then connecting the 9V power supply, next release about 45 seconds, will emit sound at the dynamic buzzer, and then take away the 9 volts out.
Third, slide S1-switch to number 3, next connecting power supply to the circuit, then release about 90 seconds will emit sound at the dynamic buzzer.
Application of timer circuit
Frist, position 1. We can adjust the time at VR-500K between of 22 seconds up to 1 hour timer circuit.
Second, position 2. We can adjust the time at VR-500K between of 45 seconds up to 2 hour timer circuit.
Third, position 3. We can adjust the time at VR-500K between of 90 seconds up to 4 hour timer circuit.
The power supply, if do not use often can use the 9V battery. But if use very often. should use 9 volt adapter or this projects:
The detail components
Resistors
R1: 1M
R2: 3K
R3: 10K
R4, R7: 5K
R5: 120K
R6: 300K
The potentiometer
VR1: 250K
The electrolytic capacitors
C1:4.7uF
C2:10uF
C3, C4: 2.2uF
The ceramic capacitors
C2, C3: 0.0015uF
The transistor
TR1-TR3: C458, C828, C945, C1815
D1-D3: 1N4148__75V 150mA Diodes
IC1: CD4060___14 stage ripple counter and oscillator IC
GET UPDATE VIA EMAIL
I always try to make Electronics Learning Easy.
Related Posts

I love electronics. I have been learning about them through creating simple electronic circuits or small projects. And now I am also having my children do the same. Nevertheless, I hope you found the experiences we shared on this site useful and fulfilling.



Can I get the pcb layOut design?
Yes .email me and i will giv it to u.
Yes.email me n i will giv it to u
can i get the pcb layout Design?
thanks
can i get the pcb layout Design?
thanks
[email protected]
can i get the pcb layout Design?
thanks sir 🙂
[email protected]
hallo,
ihre neu gestaltete webseite gefällt mir sehr gut………ist nun übersichtlicher.
die ganzen schaltungen sind super……immer was interessantees dabei.
bitte weiter so!
viele grüße
walter
how can i design a circuit of one power supply, a control circuit, two tanks of water with a pump so as the tanks of water to work seperate after being filled with water for a certain period of time.
gnanam power point no 20 sathan kulam main road agappaikulam nazareth pin 628617 thothokudi dist
electranice pcb ranning bord kit inverter bord kit
hello,
How does calculated delay time based on the switch selector and frequency generator(R1,R2,VR1,C3,C4)??What’s the Formula???Please help me..
Thanks in advance.
can i get the pcb layout Design?
[email protected]
Yes, You can get PCB layout on this article.
Great Explanation!!! Thank You So Much!!!!!!
It is my pleasure.
Can you do a 4060 synth circuit?
Hello Joshua Miller,
I have always liked to learn. Sometimes I don’t understand. Hope you can guide me further. We will learn together.
What is a synth circuit?
Thanks